Patches' Acre

My photo
Welcome to our acre, where we look to grow closer to each other, God and our patch of land in the world. We welcome your advice and encouragement as we walk along this road together. ~Karin De La Rosa

Sunday, March 24, 2013

Sorry FDA, there is a difference between rBST and non-rBST

I have never been so mad at the grocery story as I was tonight.  Usually being surrounded by food, especially anything dairy, brings joy to my life.  However tonight as I browsed the cheese cases  I was personally affronted when I read the following label " The FDA has said no significant difference and no test can now distinguish between milk from rBST and non-rBST treated cows.  I was stopped in my tracks fuming.  Considering it is now an hour since I took this photo you can tell it still has my blood pressure up.  

Here's my rBST story.

When I was in my teens I was "diagnosed" as lactose intolerant and for the next 20+ years I avoided milk like the plaque because I knew what would happen.  After one glass of milk I was doubled over with such severe abdominal pain all I wanted to do was curl up in the fetal position and whine for about 3 days.  Over the next 20 years I would have milk every now and then, and would always experience the same symptoms.

Glass of milk tonight
3 years ago I drank a glass of regular store milk knowing what would happen, but hoping upon hope that this time would be different I just wanted a taste.  You see I miss milk.  It wasn't different. And for three days the intestinal battle waged and I did my best not to crawl into the fetal position at work.  
A week later, having just come out of the intestinal funk a few days before, some new friends invited me over for dinner.  They are milk-a-holics.  So of course they served milk with dinner.  I knew what would happen, but I am always so tempted by that tall glass of creamy goodness.  I enjoyed my glass of milk with dinner and I waited. The next day I waited, I kept waiting and nothing.  No reaction.

mmmmm -mmmmm good!

As I had just had my usual reaction with the other milk I wondered what was different.  I knew it was cows milk, not almond or rice, but I had no reaction.  So I called my friends and asked them about the milk they had served.  They told me the brand and described to me that it has two different qualities than traditional milk - (1) no rBST (2) Low/Slow Pasteurized  This combination is perfect for my body.  I no longer run from a glass of milk, I enjoy it and the days that follow.  

Another interesting note, as I thought back to when I first started having issues with milk I learned something interesting.  rBST was introduced about that same time.  Coincidence?  

The best part about "my" milk (other than I can stomach it that is)?  It's local.  Made right here in Moravia NY!  One of these days Dann and I will go on a field trip to meet our dairy farmers and thank them in person.  Cheers!  

ps.  As for the FDAs findings I must say I'm not surprised based on the use of rBST in the dairy industry.  Even cows not treated with it in this generation may have multiple generations use of it in their bodies.

pps.  If you have ever been diagnosed as lactose intolerant or suspect you may be, all I can do is say I was once like you, but there might be hope.


Monday, February 18, 2013

Farm 2013: Onions Started

9 cartons planted
A growing station has been going for a few weeks now.  I set up some lettuce and herb seedlings back in January.  Unfortunately with the cold weather the temperature in the basement has not been ideal.  While we have lots of young seedlings nothing is of harvest nor transplant size.
Today I dusted off my second seedling station and started the onion seeds.  As I continue to learn how to farm one thing I have uncovered is that starting onions by seed in our climate is not optimal for full size bulbs.  Most farmers transplant onion sets, which are small onion bulbs, sometimes started by other companies in better climates.  And some farmers, like myself, start their onions on their own farm.
I'm big on reuse and composting of items so of course I've been saving half gallon milk cartons for months now for seed planting.  I cut the cartons in half lengthwise.  The half used when pouring the milk is relegated for transporting treats for the ladies, like their hot oatmeal this morning with our 4 degree temperatures.  The other half half which is still sealed, is saved for seed starting purposes.
Grow lights lowered
I filled the carton half way with soil.  Added a slurry that included some organic fertilizer, mixed the soil & slurry.  Once the soil was mixed, I layered the seeds on top, added a little more soil and a dusting of water and covered them with plastic lids to help hold the moisture in.  The grow lights were then lowered to just above the covers.

Tuesday, January 31, 2012

Buffalo Wing Dip

This recipe is a special request from my big brother.  So here's a shout out to Kevin and to Super Bowl fans far and wide.  This is a must have recipe for any event you may be hosting or attending this weekend.  I am always amazed at the rave reviews we get when we bring this dish to gatherings - it's so simple and seems so common (especially in Buffalo), but my guess is while many other recipes call for Blue Cheese this one calls for Ranch and as such is probably much milder than others you see/taste out there.  And of course you can never go wrong with 2 packages of creem cheese!

Hope you enjoy as much as our families do!

Ingredients
1 chicken breast (about 1/2 lb), poached 
2 (8oz) packages cream cheese, softened
1 cup ranch dressing
3/4 cup Frank's Red Hot
1 1/2 cup shredded cheddar cheese
1 bunch Celery cut in to 4 inch slices
1 bunch Carrots cut in to 4 inch slices
1 bag Tortilla chips

To poach the chicken breast you can use water or better yet, use some Frank's Red Hot sauce.  Place the breast in a small pot, just cover the chicken with liquid, bring to a boil, cover the pot and simmer for 10 minutes.  Allow the chicken to rest in the pan in the liquid for 15-20 minutes (pot should still be covered).

Remove the chicken to a cutting board and shred using 2 forks.

In a medium sauce pan heat the Frank's Red Hot and add the shredded chicken.  Stir to combine.  Once the chicken and sauce is heated through, add the cream cheese and ranch dressing.  Cook, stirring until well blended and warm.  Mix in half of the shredded cheese and transfer either to a 9x9 baking dish or to a small slow cooker.  Top with the remaining cheese.

If using a 9x9 baking dish, cook for approximately 20 minutes at 350 or until the cheese is melted and the dip is bubbly.

If using the Slow Cooker, top with remaining cheese and turn to the low setting.  Serve when the dip is hot and bubbly.

Dig in!  But be sure to hit the gym the next day!

Tuesday, January 17, 2012

Pancakes - Breakfast for Dinner

Sometimes you just have to do it.  After being out of town for the weekend, and coming home to a pretty empty fridge we scouted to see what could be on the menu for the week.  The buttermilk was "going bad" magically the next day according to the stamp on the package so we opted for buttermilk pancakes with bacon for dinner.

I've gotten a lot more adventurous with my baking.  I used to follow all recipes, then I gave up on general cooking recipes for the most part but was still devout in following baking recipes.  I have since given up on those as well.  I look at them for general guidelines, but I like to see if I make a tweak here or there what might happen.

So my Buttermilk Pancake recipe is based on a recipe from a Cooking Light Cookbook circa about 1999. 

1 1/4 Cup Buttermilk
1/2 Cup Oats
1 teaspoon vanilla - I never measure, just pour and pray as my motto goes, also - feel free to substitute almond extract every now and then for splash of something different!
2 Tablespoons Maple Syrup

Stir together and let the above soak for about 10 minutes stirring every now and then.

While the oats are soaking, in a separate bowl mix together:
1 1/4 Cup Flour
1/2 teaspoon baking soda
1/4 teaspoon salt.

After 10 minutes, add 1 egg lightly beaten and 1 Tablespoon of oil to the oat mixture.  Fold the flour mixture in to the oat mixture.  Drop about 1/4 cup dollops on a hot griddle and cook on one side until you see bubbles forming.  Flip over and cook on the other side until done.

This recipe makes about 10 pancakes.

Note:  The original recipe called for 2 Tablespoons of brown sugar to be added to the dry ingredients.  I;ve started switching the brown sugar out with Maple Syrup to keep my ingredients as local as I can - and you are going to put it on top anyway, so why not also have it inside the pancakes.  The Oats, Flour, Maple Syrup and Egg were all locally sourced.  As of course was the bacon. 

Wednesday, January 11, 2012

Ahhhh....Chili

Chili is such a favorite and we don't make it often enough.  I honestly don't know why.  And preparing to document this recipe once again brought to my attention that I cook for the love of cooking.  Recipes float in my head - reminders from childhood, family, friends, cookbooks or articles, and somehow they come together into a delicious meal, I often don't measure, but enjoy the art of improvising when I cook.  As Dann said tonight, chili will never taste like this again.  It could be driven by the quality of ingredients, the list of ingredients, the order in which they are introduced to the pot, but really who knows.  We just know we like chili and in the end it's similar to the last time - right?

The Chili I finished cooking today was a multi-day process through no fault of its own. 

The tomatoes used in the sauce were from our garden this summer and had been cooked down into crushed tomatoes and frozen in the fall.  The Green/Red peppers were bought in bulk at the farmers market this past summer, sliced and frozen the same day.

The ground beef (from Duink Farm in Hamburg, NY) was cooked on Sunday as I needed some for a dish earlier in the week and thought to just cook it all at one time.  Little did I know the distress this would cause Dann.  My husband, who never has a clue what is in our refrigerator, was VERY aware of the 1 1/2 pounds of ground beef that sat there unused awaiting its swim in the chili bath.

The black beans were from our summer harvest.  If you don't think you have a green thumb, try growing dry beans.  You plant them, then ignore them - so easy! And kids LOVE shelling them.  I LOVE shelling them.  I was always so amazed that out of such a dry paste colored shell could come something so perfectly shaped and ink black.  With assistance from my young friend Emily Morrison this summer and my niece McKenzie this past weekend, the black beans were all shelled.  Monday they went into a water bath to reconstitute and then Monday night they were put in the crockpot over night to soften even more.

The rest of the chili ingredients were also primarily local - onions and carrots from our Winter CSA share through Thorpes Organic Family Farm, garlic from our garden, and a dash of Honey from Bob Colligan's bees. 

I find I cook mostly on the whim of the day.  This morning as I assembled the chili I started the crockpot on low and diced 2 red onions, adding them to the warming crockpot as I went along.  Next added were the carrots - I diced about 4 medium carrots.  I then added what I believe to be the equivalent of 2 Green Peppers.  By the time the peppers where being added to the pot I could smell the onions.  Also about this time I realized my crock was about half full and I hadn't added any meat, beans or sauce yet. Next in went 4 gloves of garlic - pressed.

I stirred the vegetables together and then added the tomatoes- I used 4 small canning jars and 1 large canning jar worth of crushed tomatoes.  Next came the ground beef.  I only added about 1lb because by this time my crockpot was getting pretty full and I knew I still had beans to add and they would also be adding protein.

Of course chili powder, cumin, salt and pepper where added - these are always added to taste, I never measure, I just pour and pray!  I figure heavy on everything but the salt and we'll be good.  I also added a few dashes of a special seasoning my parents get Dann on their trips to Florida - Pirates Bite.  It's a blend of 7 peppers, so this was the perfect dish to include it on!

Everything was in the pot swimming by 7:30am

About 4:30pm I finally added the black beans (about 3 hours before serving), the other vegetables had softened enough and some of the liquid had cooked off making room for the beans.  There were approximately 3 cups of beans added.  I would have liked to have more, but that would have meant I needed to grow more...watch out Garden 2012 - I feel rows of turtle beans in our future!!

I added a dash of honey at the end - about a tablespoon or so.  This helps cut the acidity of the tomatoes primarily and just blends all the flavors together so nicely.

And don't ask me why, but growing up I always remember having chili over mashed potatoes so of course about 1 hour before you plan on serving the chili, dice up a bunch of potatoes (don't peel - skins mash fine and they are good for you anyway and so much less work!) and put in a large pot.  Add some peeled garlic cloves and enough water to just barely cover the potatoes.  Bring to a boil and boil for about 30 minutes (or until tender) .  Add butter, milk and salt and pepper to taste and mash.  I use a hand mixer when adding garlic cloves to my potatoes just to ensure someones doesn't bite into a clove thinking they have a potato! 

Dish up some potatoes and layer some chili on top and dig in.  So delicious!!!

Wednesday, January 4, 2012

Roasted Butternut Squash Soup - with Jalapeno

Butternut Squash stored in our basement
What goes better with zero degree weather then soup? This recipe is a culmination of recommendations from friends, family and flipping through the pages of cookbooks.

Dann & I fell in love with Butternut Squash Soup several years ago on a trip back to Buffalo when we were still living in NC.  We were in town for the holidays and knowing the indulgent attitude one takes during the holidays our friends Bill & Susan were kind enough to invite us over for a soup and salad dinner. Some form of this soup has graced our winter dinners ever since. 
The first several times I made the soup I peeled the Butternut Squash and boiled it in chicken stock along with potatoes, carrots, onion, and celery and then used our hand blender to emulsify the ingredients. While this is a one step process in the pot I must admit, peeling butternut squash is not my idea of fun - even with the fancy peeler my mom bought special for the task. 

Enter the roasting method - my new path to delicious soup!  Preheat the oven to 425 degrees.  Peel the potatoes, cut the carrots and onions in large chunks and put them on a roasting pan.  Drizzle them with olive oil, salt & pepper.  Cut the squash, remove the seeds and place the chunks of squash upside down on the roasting pan - skin and all!  Set the timer for 45 minutes and walk away. 

When the timer dings remove the pan from the oven and let the vegetables cool for about 10 minutes.  Once cooled, the peel comes right off the squash!  Now quite honestly, you can do this entire part the day before and refrigerate until you are ready to make the soup the next day (or do in batches and freeze).  But typically I go right on to step 2.

Step 2:  Place all of the roasted ingredients in a dutch oven and add enough poultry stock to cover the ingredients by about 1 inch.  Bring to a boil.  Reduce heat and add garlic and if you'd like some heat - add a jalapeno!  Simmer for about 5-10 minutes and then use an immersion blender (or blender) and process until creamy.  This was our first time adding the jalapeno and it was phenomenal! 
The biggest surprise for me with this soup is always how creamy it is without ever adding any cream! 

Special Note:  All of the ingredients used for the soup were from our home garden with the exception of the turkey used in our stock (made from the remnants of our Thanksgiving Turkey compliments of Oink & Gobble farm in the Finger Lake district of NY) and of course the olive oil, salt & pepper.  I find it overwhelming that for a few dollar in seeds we can eat like a king and queen from our little acre.

Below is a full list of ingredients used in this latest batch of Roasted Butternut Squash Soup - play around with it and see what works best for you.  Cooking should never be boring, it should always be an adventure!

1 small Butternut Squash
2 medium sized potatoes
1 large onion
2 carrots
Dash Olive Oil, Salt, Pepper
Stock - enough to cover the veggies (about 6 cups+/-)
Garlic
Jalapeno

Monday, December 26, 2011

Challah Bread with Blueberries

I bought a new cookbook recently, Cooking from the Farmers' Market.  One of the recipes in the book is for Blueberry Summer Pudding.  Well it is not summer, but we LOVE Childs Blueberries and after our U-Pick summer we have a freezer with an ample supply of the little darlings so I thought, Why not celebrate Summer at Christmas?  Especially given this crazy weather we are having.  So amongst all the cookies and pies made by the rest of the De La Rosa family, we contributed Blueberry Summer Pudding to the holiday dessert spread.   

We used Challah bread made by our friend Paula (Welcome Farm Bakery) and Honey from Bob Coligan - both available at the East Aurora Cooperative Market's Mini Market (check the Co-Ops website for more information on the mini market hours and their bread days!)

With a topping of fresh Cinnamon tinted whipped cream, the result was amazing!  I can't wait to make this again in the summer with just picked blueberries!  I would imagine most berries could be substituted for blueberries, or a combination would be nice.  Of course Peaches would be outstanding too.  Please give this one a try - you will not be disappointed!

Blueberry Summer Pudding - Cooking from the Farmers' Market

6 Cups Blueberries - pick during the season and freeze on a cookie sheet, transfer to a freezer safe bag and enjoy all winter long!
1/2 Cup granulated sugar (we used honey)
1 Tbsp fresh lemon juice (we used oranges from our Winter CSA Share)
2 tsp finley grate lemon zest (again with the orange from our Winter Share)
Pinch of Salt
1tsp pure vanilla extract
12 slices challah, about 1/2 inch thick
1 cup heavy cream
2 Tbsp Confectioners' Sugar
1/2 tsp ground cinnamon

In a large saucepan, combine 2 cups of the blueberries, honey, orange juice, zest and salt.  Bring to a boil.  Reduce heat to medium and cook, stirring occasionally and gently crushing the berries as they soften until the berries are juicy and thickened 6-8 minutes.  Remove from the heat and stir in the remaining 4 cups of berries and the vanilla.

Line a 6 cup bowl with plastic wrap, leaving a 3 inch overhang.  Line the prepared bowel with the bread, covering it completely and cutting the bread so that it fits in a single layer.  Pour in the berry mixture and top with the remaining bread slices to cover completely  Cover with the overhanging plastic wrap and then with the a plate just slightly smaller than the diameter of the bowl.  Weight with a can.  Refrigerate overnight or for up to 24 hours.

Just before serving whip the cream, confectioners' sugar and cinnamon in a bowl until soft peaks form.  Remove the can, plate and plastic wrap from the pudding.  Unmold onto a plate.  Cut into wedges and serve with the whipped cream. 


Wednesday, December 21, 2011

A U-Pick Summer

Today got me thinking back to this past summer.  Seems odd as it is December 21, the first day of winter, but the 60 degree temperature has me a little out of sorts.

I love the long, supposedly lazy, days of summer, especially here in Western New York. Our days were far from lazy, but were long and quite enjoyable as weekdays were spent in the yard until dusk attempted to turn in to dark and weekends were spent embracing our Western New York farm land as we went from U-pick farm to U-pick farm or worked on our own little acre.

Left to Right:  McKenzie, Dann Maren
and Madison
This year we harvested strawberries close to home, cherries with a full day trip up to Lake Ontario region, blueberries, Apples and Grapes all of which had us driving the southern roads of Western New York, including a dirt road on the blueberry trip as we included a visit to meet a local NOFA-NY chicken farmer about organic feed for the ladies.
During these trips I have been thoroughly entertained by our fellow pickers.  At the strawberry field I am sure we were the highlight having 3 of our nieces with us.  They certainly kept us entertained!  While we were cherry picking there was a group looking to pick over 100lbs of cherries.  100 pounds!!!  
Singer Farms:  Cherry Picking

While blueberry picking I was treated to 3 boys, I assume brothers, where the oldest (maybe 12?) was coaching his siblings on where to find THE BEST blueberries - in the middle of the bush!  Of course there were also the slightly older teen girls talking about who likes who.  I even had my bum spanked by a toddler wanting to get my attention to give me a blueberry leaf.  But nothing quite tops the scene as we pulled up to a farm to pick Apples and Grapes.  About 100 feet before we pulled in to park stood a Bull.  Yup, you got that right a real live Bull just standing by the grape vines.  We determined grapes just might NOT be on the agenda if Mr. Bull didn't find his way home.  Fortunately as we were heading out for the Apples we noticed the farmer across the way had come to fetch his Bull.  I'm still not quite sure how one goes about "fetching a bull" but the farmer did it quite handily from my observation deck quite a ways a way and we were able to go home with some grapes after all.
Childs Blueberry Farm
As we were picking I reflected on how sad it is that for so many their first introductions to fruit are from the grocery store aisle, and not from the fields. And in for many this may be their only experience with fruit. To think a strawberry is hard and tasteless and never quite strawberry in color. A cherry tasting like bland nothingness around a pit or heaven forbid maraschino is your only experience. There is no comparison to a fresh picked berry or cherry. I now find myself cringing when I see people eating “fresh” strawberries in August, knowing they are not local and could not possibly taste the same as those picked at their peak and whisked to your farmers markets in mere hours.

The best part of these trips?  First, and foremost, time with Dann, including introducing him to the age old contest of cherry pit spitting.  Yes, just shy of 40, Dann spit his first cherry pit!  Second, an opportunity to get to know Western New York better and enjoy the incredible scenery around us, third, a freezer full of fresh frozen summer fruit that we are enjoying as the weather turns......cold? 

Monday, December 19, 2011

Dear Santa, the Farmer's touch

I remember back to my days as a child when the store gift catalogs would come out.  I would spend hours making my lists and checking them twice or twenty times, who was counting?  Did I want one toy horse or two, was there room for dolls and clothes and the new dollhouse? was I asking for too much?  did Santa have room for more in his sleigh?  I would deer tag pages, cut out pictures and have lists with some things scratched out and others added in until finally...just the right list emerged and was mailed to the guy in the red suit.

Fast forward 30 years (ok, that is scary to say, but sadly true) and this past month has found me pouring over catalogs, cutting out pictures and making a scrapbook only of a different sort...seeds.  Whatever will be in the garden this coming spring?  What do I want to grow vs what can I get from the local farmers market?  What is fun and exciting vs. every day?

This past summer taught me that I can not have a full time job and a full time garden and expect to have any semblance of a life.  So Garden 2012 is currently designed to be scaled back, way back.  Of course that was before the glossy catalogs started arriving promising of flavors and combinations that were must haves.  But alas after much thought and deliberation I have narrowed the selection down quite well if I may say so myself. 

Now to be perfectly honest, I saved a good amount of seed from my harvesting this year to try my hand at seed saving, but of course many of those are not the varieties I'm considering for 2012.  That would be too easy.  I want to try the tomato that looks like a plum and the one that looks like a peach and has fuzzy skin.  I want Chocolate Peppers - hello, it is in the name!  Who wouldn't want CHOCOLATE peppers???  and the rumors I've heard regarding Long Island Cheese pumpkins, well I just have to try to grow them so my pies can taste that good!!  and a cucumber that looks like a lemon?  Say it isn't so!!  That will really confuse my guests when I make refreshing cucumber water in the summer!

So as Christmas rolls around again this year my Letter to Santa looks something like this.


Dear Santa,

How are you doing? I’ve been very good this year. I hope you and the reindeer have been eating well this last year. And while we are on the topic of food I thought I might ask for a few items to be placed under the tree. If it is easier for you HighMowing Organics and Johnny Seed carry my whole list, so you might just want to go straight to the source.

1 pkt Indigo Rose Tomato Seed

1 pkt Waspsinicon Peach Tomato Seed

1 pkt Long Island Cheese Pumpkin Seed

1 pkt Lemon Cucumber

1 pkt Dinosaur Kale

.....

Not to be picky, but I do prefer Organic Seed, I'd rather not have my pesticides grown in my vegetables and it is not good for you or the reindeer either!

And one last thing if you could...a real horse this year?

Thanks Santa!

Yours Truly,

KDLR

Sunday, December 18, 2011

10 Years!

Dann and I were able to get away this weekend to celebrate our 10 year anniversary.  We were just under 2 months late in getting away, but the fall weekends were busy putting the garden to bed for the winter and quite honestly I couldn't have dreamed of a better time to head to the Finger Lakes.

We arrived in Geneva, NY by way of the Finger Lakes Beer Trail.  After so many wine trails to support the Mrs. over the last 10 years I wanted to make sure there was celebration of Dann too!  Fortunately for me they had Root beer on Tap too with bottomless sampling so I was quite content!  We stayed at Belhurst Castle in a turret suite on the 2nd floor looking out over Seneca Lake with a huge, original, fireplace.  It was breath taking to say the least and the complimentary wine spigot was 10 steps outside our door!  Red wine flowing freely!

Our first visit after settling in to our room was to the Wine and Gift shop were we enjoyed samples of the Castle's wines and were able to locate a Christmas gift for the Mrs.  I lost my great grandmother's spoon ring about 15+ years ago and have been looking for just the right one ever since.  Low and behold - the Castle gift shop scours for spoon rings at antique shops and the like and had one that is very similar to my great Grandmother's!  It is now proudly displayed on my right hand!

At dinner Friday night the chef came out to visit us at our table and was curious if I was sporting a new diamond ring - had them all thinking we just got engaged, not bad after 10 years of marriage!!  Must have been the beer trail followed by the wine sampling?

Saturday morning we woke to large snowflakes falling out our window and over Seneca Lake.  What a beautiful scene.  The morning was spent at the on site spa where we both had 2 hours of pure indulgence and relaxation.  Afterwards we toured around Geneva, eating lunch at Red Dove Tavern which sources its food from many local farmers and artisans.  We followed with chocolate for dessert from (whisper) chocolate.  Then it was on to more beer and wine sampling and of course some cheese!!

We headed to 3 Brothers Winery and Estate which includes 3 wineries and 1 brewery on site.  Each winery was very unique and the staff was amazing!  After 3 Brothers we headed to Muranda Cheese Company where owner Tom Murray provided an amazing sampling of their cheeses and even provided a tour of the cheese room where the cheeses are aging.  I was in awe.  It was hard to pick cheeses to buy as I really wanted them all!  Tom was out of several cheeses due to the growth of the artisan market tours in the Finger Lakes - in 2010 he averaged 50 guests a day in the summer, this past summer he averaged 250 a day!  Thank you to all who are there to support our local artisans!  Of course we gave a hearty thanks to the ladies that make it all possible as we admired the Holsteins in the milking room which is located right across the drive from the Cheese Shop!

We did relax during our weekend too with plenty of time spent in front of the large fireplace in our suite.  Here's to the best 10 years of my life and many many more to come!  Cheers!

Wednesday, November 30, 2011

Giving Thanks

I started this post before Thanksgiving, but of course preparation took a front seat to my time on-line.  We were blessed to have my parents arrive on Tuesday evening and my brother's family arrive Wednesday evening prior to Thanksgiving.  On thanksgiving we had our local adopted family members, the Morrison's, join us as well.  The time having everyone visiting with us is always chaotic but I wouldn't want it any other way. 

As I prepared for Thanksgiving this year I reflected on the year with a heart full of Thanks. For God's countless grace and mercy.  For a husband, who loves me no matter how many home and garden projects, not to mention the countless career options, that ebb and flow through my mind.  For family that is always just a phone call or excursion away. For old and new friendships that grow and change like the seasons.  For six beautiful hens that always make my heart feel full and put a smile on my face.  And for a home with a yard that is like a slice of Eden.

As we began our preparations for Thanksgiving dinner I was amazed how much of our dinner would come from either our own backyard, our "U pick" efforts, or our local farmers.  While this is common place for our meals these days, it is such a joy for me to share this way of eating/living with loved ones.  And I am most proud to say, I only opened one can the whole weekend (other than things I had canned myself).  I didn't research a substitute for sweetened condensed milk, so that was my slip this year.

The garden provided garlic scapes, garlic, onions, green beans, potatoes, tomatoes, rosemary, oregano, carrots, blueberries, black raspberries, and pumpkins...oh and of course eggs...to our menu.  Our U-pick efforts added peaches, blueberries, cherries, apples and strawberries.  Our local farmer items included turkey (Oink & Gobble Farm), ham (Duink Farm), honey (Bob Colligan), bread (Welcome Farm), maple sugar (L.W. George Family), rutabaga, parsnip and celery (these last 3 came from the East Aurora Farmers Market).

This bounty of locally grown and lovingly raised foods along with the love of the hands that prepared each and every dish provided me with a whole new appreciation for the day.  This meal is what Thanksgiving is all about - a toast to the harvests from a years worth labor (garlic is planted in October the year before) and to family and friends. 

A garden is a labor of love that loves you back in such a grand gesture.  I am so thankful.

Saturday, November 19, 2011

2012 Garden Design

It seems only fitting on the day that we are installing the snow fence I would reflect back to a warmer time....

Back in July during a trip to NJ Dann stumbled upon a Garden design incorporating a chicken tractor when he and Lou Zampitella were supposed to be looking up restaurant menus.  Little did Dann know at the time what he had done.  The wife's wheels started turning which is never a restful sign.  Permaculture/ Sustainable design you say? Chickens and Veggies together?  and a winter home for the ladies to boot?  My first thought - We can build that, no, we must build that!
Much of July was spent with me plotting and planning - literally.  I measured areas of the yard, got out my graph paper, cut various shapes and moved my cut-outs here and there on the paper until I found the perfect layout.  Late into the evening one day in August Dann and I transferred my graph paper design by pounding in the stakes and used string to outline the garden beds.   The beds are 12 feet long by 4 foot wide with 2 beds per V shape.

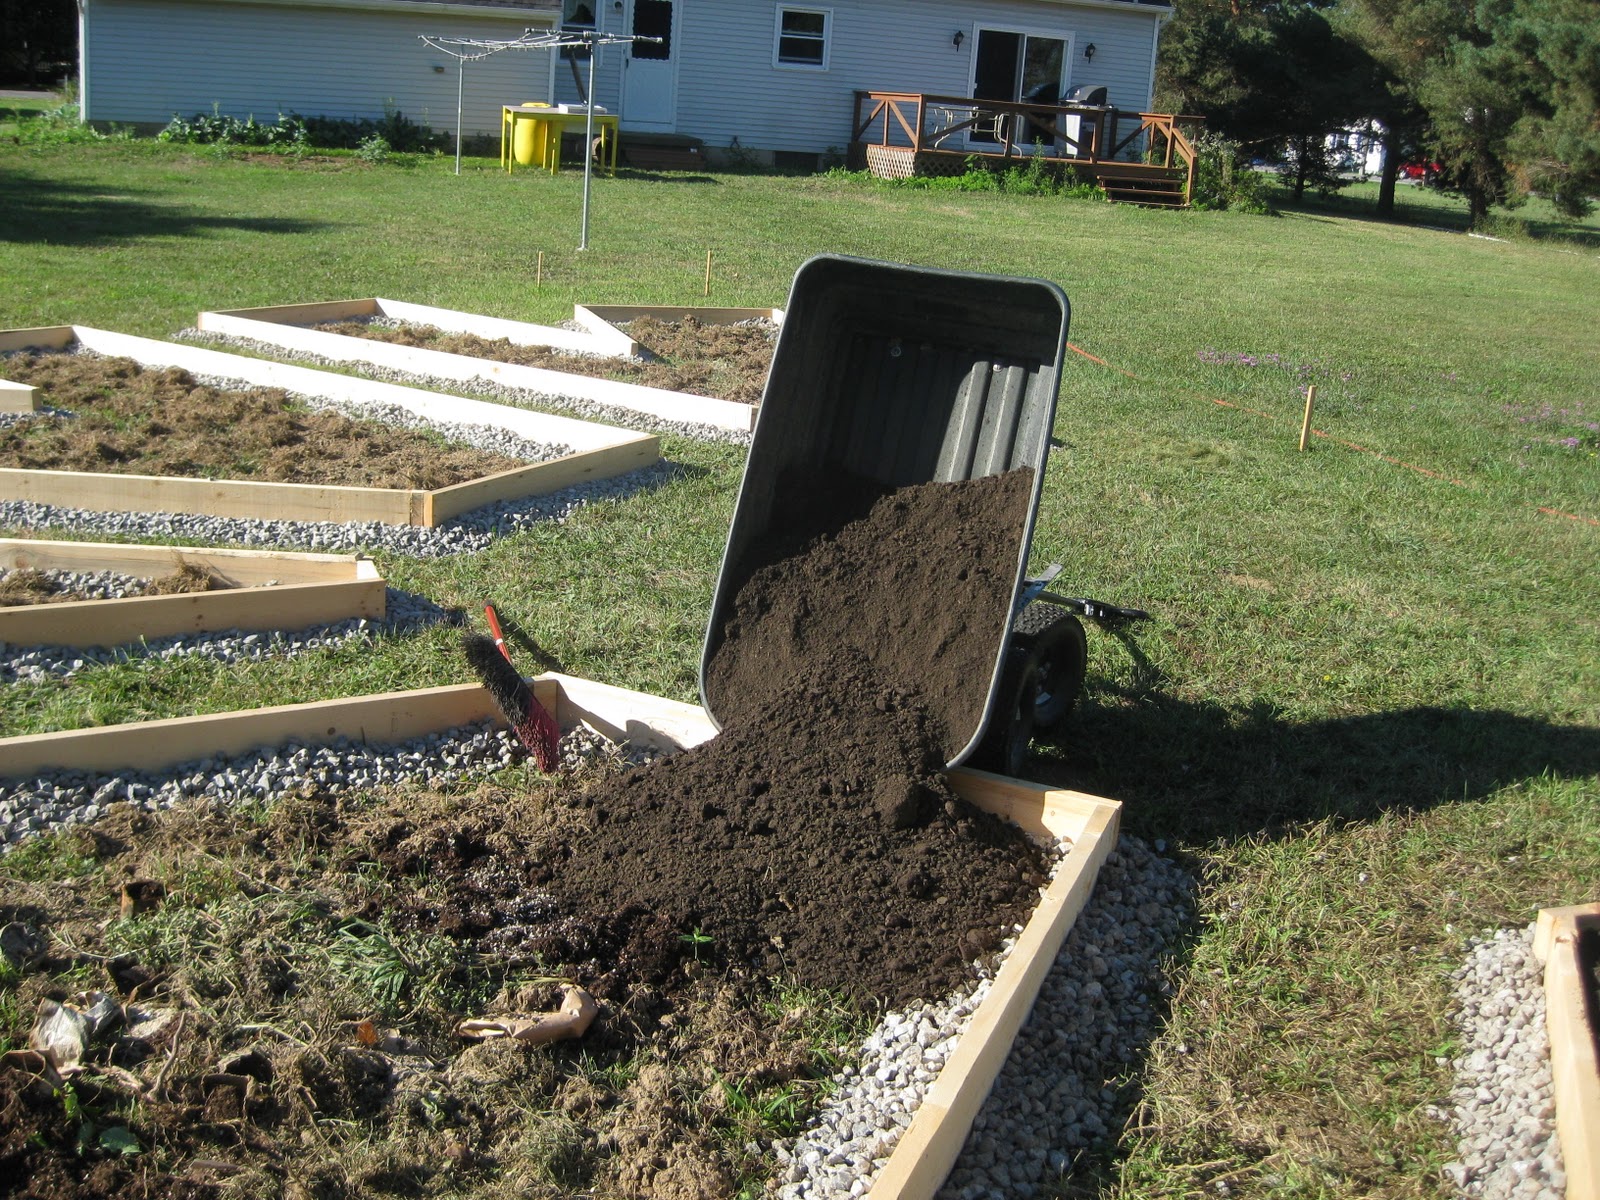
The next day, I started digging out the bed frames.  Followed by a day of laying rock in the beds.

Remember, this was August in NY.  And vacation time for me.  Unfortunately Dann couldn't take any time off.  So I worked mornings while it was cooler and typically rested by early afternoon in my trusty hammock.  The rock laying was as far as I could go myself and quite honestly I was exhausted after lining all the beds. So it was time to call in the big guns - Dann - for the framing.  Fortunately framing was timed perfectly with the weekend and Dann's availability!

After the framing was complete, Dann was kind enough to line the beds again with rock on both sides so I could save my arms for the next task... adding soil and compost to the beds. 
The design is currently in the shape of a sunset, as the beds (aka rays) face east.  I feel this is very fitting to our location on top of a hill with beautiful sunsets all year long.  And, you may have noted I said currently in the shape of a sunset.  We have room to grow to incorporate a full "sun" should the mood strike us!

With the beds complete, the next step was to build the chicken's main house.  The design calls for the main house to be in the center of the garden with doors leading out to each of the raised beds.  A tunnel will be attached from the main house to the tractor which will be built to rest inside one of the raised beds.  The chickens will then be able to run between the home and the tractor as weather, predators and their mood suits. 
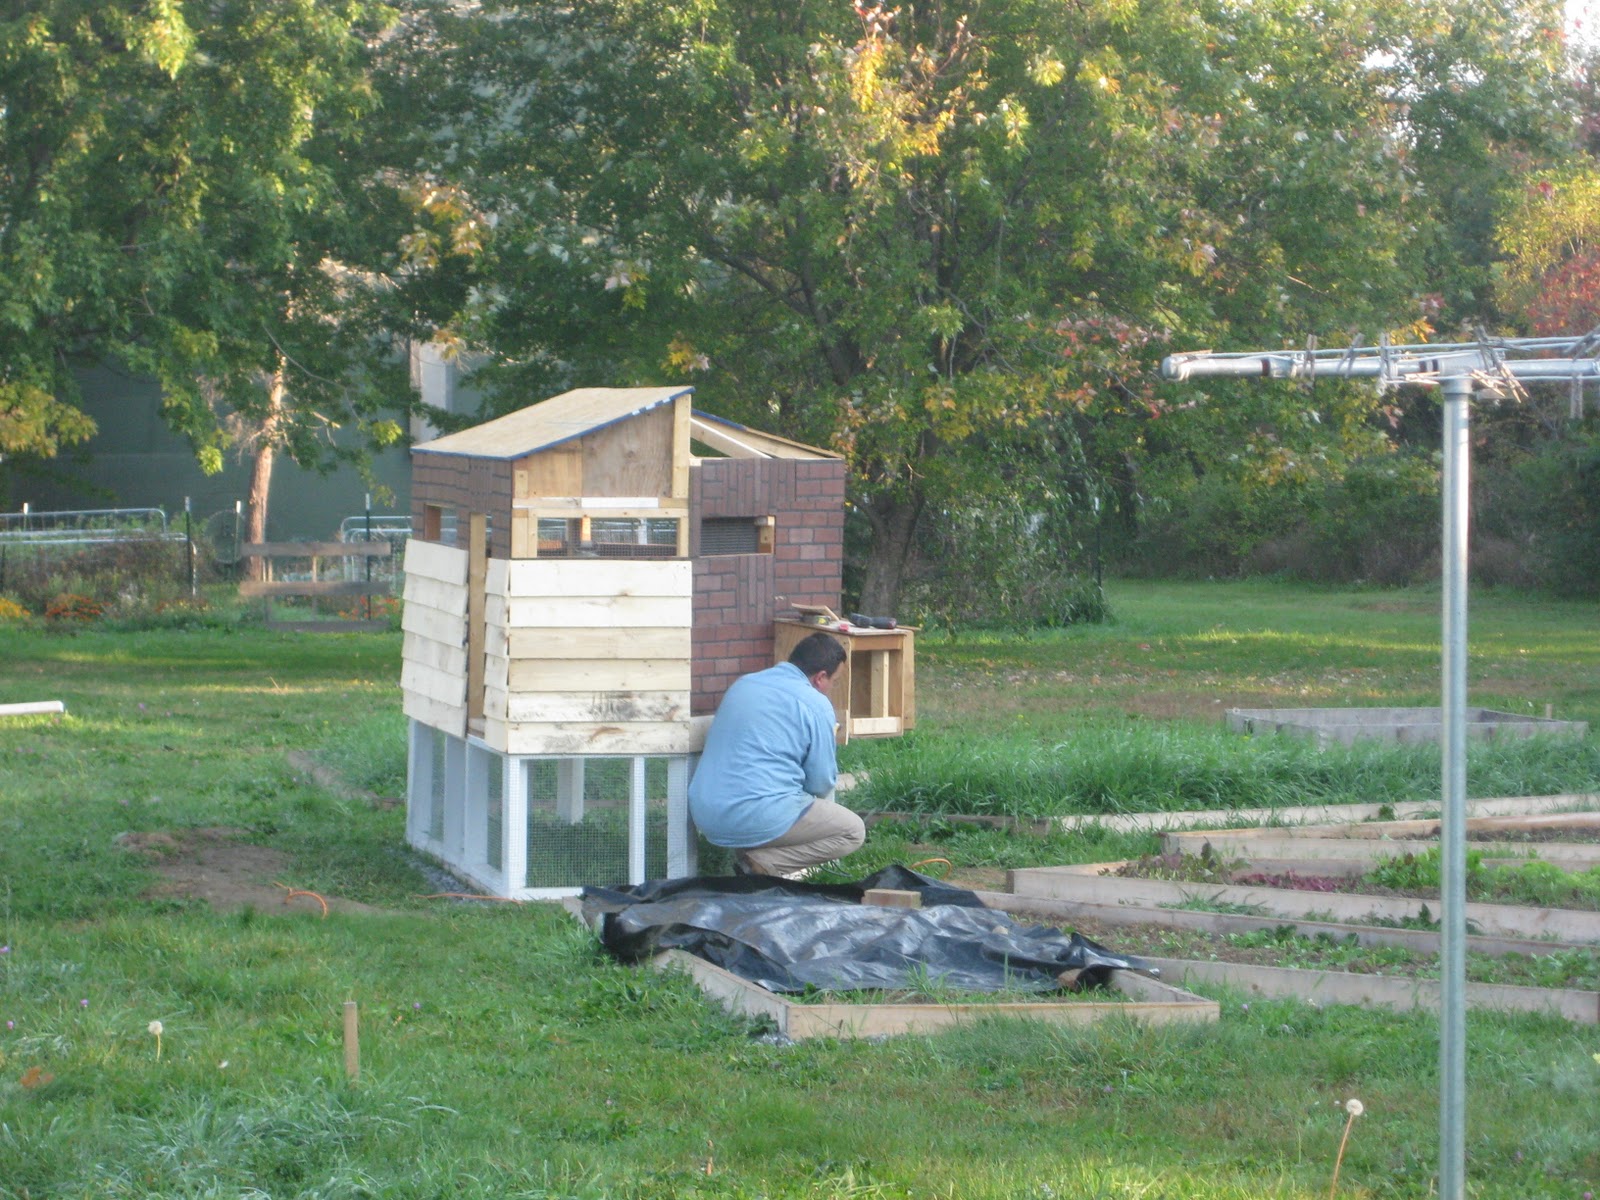
House construction took a few months as it was done all by Dann primarily on weekends. The house is were we strayed completely from the design we had seen online. Knowing the ladies would be in the house for the better part of 4 months due to our weather we wanted to provide them opportunity to roam a little during that time so we built a lower level that is encased in wire fencing that is buried so predators cannot dig their way in.
Dann used scrap 2x4's that we had in the garage for framing, scrap board from the local hardware store for "insulation" and then pallet boards for the siding.  A day lamp and heat lamp were installed, along with a feeder and waterer.  Roofing material from an old chicken tractor was used to top it all off.  On November 4, 2011 the ladies moved in. 

The first few days were a bit rough. They had never used a ladder before so navigating up and down was not a talent for several days.  Food treats were laid here and there to help entice them in the direction we wanted them to go and after a week they have mastered their new home!

Now all that is left is to enclose the bottom so they can roam below during the winter.  Hopefully the weather will stay on our side and we will be able to get the framing done before a serious snow fall comes.

Once Spring arrives our plan is for the ladies to run on 4 beds while we grow on the other 4 beds.  Garlic has already been planted in 2 of the raised beds and winter greens were planted in another though I'm not stressing about building a cold frame so once the snow comes these greens are done for the season.  Winter Rye was planted in 4 beds where the chickens will have access all next year.  Come spring we will fence in the whole area.  We are in talks about letting the ladies have full reign of their half of the garden vs building a new tractor to fit the beds.  My concern, as always, is predators so more to come on this.

Now to go help with the snow fence....

Tuesday, November 15, 2011

An improvosation on Pork Medalions with Cherry Sauce


We enjoyed two of Dann's favorite's tonight - Pork and Cherries.  Dann has always loved pork, but cherries are new.  We had a wonderful time this summer when we visited a pick-your-own farm and picked aproximately 18lbs of Cherries of which we froze at least 10lbs. 

I didn't have a recipe, as usual, for our dinner tonight as the recipes I was finding online and in cookbooks had ingredients I didn't have on hand or didn't want to have on hand. As usual I was left to improvise.

An Improvosation on Pork Medalions with Cherry Sauce

Heat 1 Tbsp of oil in a large skillet over medium heat. Cut the pork tenderloin into medallions and pan fry, turning until the medallions were browned on all sides.  While the pork is browning dice one small onion.

Once browned on all sides, remove the pork tenderloin to a plate and cover with foil.  Add the onion to the pan and cooked for about 1-2 minutes.  Once softened, I added some wine - probably about 1/4 of a cup.  Feel free to use more/less as you see fit.  Using a wooden spoon, scrape up all the pan drippings from the pork into the sauce.  Add the cherries, some balsamic vinaigrette, and pepper.  If using tart cherries, you may wish to add some honey at this time as well.  Many recipes called for lemon zest, but with no lemons on hand, this was not an option for us.

Heat the sauce, stirring and,if using fresh/frozen cherries, press on cherries to extract juices and "melt" the cherries in to the sauce.  If there is not enough liquid you can add more wine, chicken stock or water.  If too much liquid cook a little longer to cook off some of the liquid.

Once the sauce is just about there, add 1 tbsp unsalted butter.  Stir until well blended.  Add medallions back to pan and turn the pork in the sauce for 2-3 minutes to reheat and absorb some of the sauce.

We also enjoyed a fresh salad made with local lettuce, pears, goat cheese and pumpkin seeds.  See below for a listing of ingredients and their origins. 

Pork Tenderloin - Duink Farm, Hamburg NY
Onion - Patches' Acre, Orchard Park, NY
Frozen Cherries - Singer Farm, Appleton, NY
Cabernet Sauvignon - Merrit Winery, Forestville, NY
Lettuce Greens - East Aurora Farmers Market
Bosc Pears - East Aurora Farmers Market
Goat Cheese - First Light Farms
Pumpkin Seeds - Patches' Acre, Orchard Park, NY

Note: non-locally grown ingredients included: Oil, Balsamic, pepper and butter.

Friday, November 11, 2011

Who do you pay?

First and foremost it is Veterans Day and a heart full THANK YOU to all the Veterans out there!  I would not have all the luxuries and choices I have today if it weren't for your incredible commitment and sacrifice.  Simple words can not really express my gratitude.

I woke up early this morning to get the applesauce going.  We've had 1 1/2 bushels of apples sitting in our house for about 3 weeks now, they have made it into lunch boxes, crisps (our favorite!) and even an upside down gingerbread cake as I await having enough time to make and can applesauce. 

While peeling and slicing the apples I decided to watch the movie Ingredients.  This is a fabulous movie about the local farm movement.  I was excited to see many new to me faces and a few faces I've come to recognize in the last year - Joan Dye Gussow and Alice Waters in particular.  I read Joan's book This Organic Life earlier this year, it is a beautiful (and at times sad) story of her life as a organic home gardener.  As of the taping of the movie Ingredients Joan hadn't bought vegetables in over 10 years, she grows everything herself in her 1,000 square foot garden.  I will be adding her latest book, Growing, Older to my Christmas wish list.

But as I watched the movie, it is a quote from Greg Higgins that hit me the most "You can pay the doctor or you can pay the farmer." 

This comment was especially fitting as I reflect on a conversation I had last evening with a couple regarding their household budget, one of their top questions to me was "How much do you think is appropriate to spend on food?" 

There are 2 key responses to this question - (1) I firmly believe how we spend our money is a reflection of our values. (2) Who do you want to pay, the Doctor or the Farmer?

I was honest with them - in our household this is one of many of our budget catagories that is out of line with many Americans.  I buy local food, supporting our local farmers and our local economy.  Not 100% of what comes in to our home is local, I do have to keep the peace with my spouse, and I haven't learned how to make my own tea blends...yet.  Surprising to many though, buying local food in season and preserving is WAY cheaper than buying what you want when you want it.  For example, I bought a bushel of the best, sweetest red/green peppers from the farmers market for $10 this summer.  You know what, I have about 3/4 of that bushel preserved in my freezer.  I would say, bought this way the peppers were less than $0.25 each.  Try to buy a pepper in January at the grocery store for that price!  These peppers will be gracing our plates all winter and spring long. 

The way we make this work in our budget though is we cut back in other areas.  We don't have cable TV - we have an antenna and Netflix (streaming only! - that whole Netflix change-up is a huge debacle that I wont get in to here!), no home phone and only the basic internet broadband service available.  Our cell phones are just that, phones - no texting, e-mails, games, fancy ring tones or the like.

Want to occupy something?  Occupy your local farmer's market this weekend - YES they are still going strong, even here in Western NY!  And be amazed at the quantity, quality and variety that awaits you!  Hearty winter greens are so flavorful when kissed by a frost!  Eat up!

Tuesday, September 13, 2011

Dann becomes the new Martha

Dann is in the running to be the next Martha Stewart, only he's a lot cuter and has a lot more integrity.  But do his kitchen and garden skills measure up?  I have been on the road more often than not it seems the last several weeks and if you farm in Northern Climes you know what September is - TOMATOES!  It really can be descriped in that one word the first week of September the grape tomatoes were coming in gallons each day (yes, that is plural), they have slowed down only to be replaced with the Plum (San Marzano) and Sandwich (Moskovich).  I know there have been a lot of tomatoes when I can't even entice the Ladies to enjoy them as a treat anymore, they look at me as if to say "Tomatoes, AGAIN?"

As I don't want to drive my husband away we are only freezing garden harvests at this time.  While I'm on the road freezing entails simply washing and putting grape tomatoes in freezer bags, and coring the other two varieites and freezing.  Freezing tomatoes can really be that simple.  When they thaw the skins come right off so no need for boiling and ice baths in the hot summer months.  The sauce/salsa, etc will have to happen at a later date. 

This weekend when I was home I was able to de-seed many plum tomatoes prior to freezing which will make for better sauce, but I did not get a chance to blanch the green beans before leaving.  Last night involved a phone call home where I instructed Dann on the finer points of blanching.  This evening's call was a reminder to harvest the tomatoes even in the rain b/c they don't stop growing, they just crack open.  I don't want to stress him related to the other vegetables at this time, so we are just focusing on the one, which happens to occupy 7 beds, about 15 feet long each, in our garden.  I think that's keeping him mighty busy. I am hopefully the other vegetables and fruits will be fine until the weekend.

Oh and all of this is happening while Dann is building the Ladies new home...I can not wait to share pictures of our 2012 Garden design!!

NOW, if I only had my camera while he was blanching the green beans!

Wednesday, August 31, 2011

Eating Local on the Road

I've been traveling a bit recently, some for work, some for fun.  No matter the reason there are a few things I've been sure to take with me - hard boiled eggs from the ladies and some form of bounty from our garden.

The last two weeks I have been traveling for work and have been in a town about 45 minutes north of Chicago, IL.  I've brought 2 hard boiled eggs for each day away and as many grape tomatoes as I can fit in my container.  For those wondering, these items are NOT liquid and can be brought on a plane in your carry on luggage.  You may get some odd looks and an extra bag check, but the taste is worth it.

My first trip out this way was last week and it was for training.  With the day and the meals provided by my employer I was happy to have snacks provided by my ladies and hard labor in the garden.  I opted out of the dinner menu selections requesting the pre-planned menu be slightly altered to offer me the option of soup and salad with my salad being a dinner size portion.  Why?  One reason really, I don't sleep well my first night out of town typically and the meal wasn't going to be served until 9pm CST, which is my typical EST bedtime.  A heavy meal would not have afforded anywhere close to a restful night sleep.

This week is my second trip out and I'm on my own so to say for meals.  The office is not near anything, so breakfast and lunches are relegated to the hotel or cafeteria, but dinners are my choice.  Again I came bearing gifts from the ladies and tomatoes from the garden.  On day 2 I could have easily finished my grape tomatoes, but I've decided to ration them.

Prior to coming for my second trip I did a bit of research.  Knowing I would be on my own for dinners I knew I would have a great deal of say in my choices.  While there is a mall with many chain restaurants supposedly just a few minutes to the west, I have been heading a few minutes further to the east and sampling from restaurants that share my love for local flavors.

Last night I enjoyed dinner at Inovasi.  With a menu that provides a listing of Farms providing their  ingredients I knew this would be a great place to start, and I was not disappointed.  I started my meal with a Watermelon Soup, followed by "The Carnivore Addition"  A menu option that explains the restaurant receives an animal from a different local farm each week and they prepare a variety of different dishes.  Last night's dish was a leg of lamb with chantrelle mushrooms.  I ended my meal with a cherry mousse.  It was divine.  I was able to get a few recommendations for other restaurants, though Inovasi is the only restaurant close to the office that provides a listing of local farm sourced items.

Taking a lead from the recommendation I received while at Inovasi I went to a sister restaurant of one recommended tonight for dinner - South Gate Cafe (Bank Lane Bistro had been the original recommendation, but I was looking for a little lighter fare this evening).  South Gate did not disappoint.  At first glance of the menu I determined I wanted to sample all of the sides and a few of the starters.  As I was dining alone, sadly this was not a reasonable menu selection, however the waiter indicated he would be more than happy to accommodate a meal of all sides...thus I started narrowing down my selection.  How could I not sample the tomato and watermelon side dish?  and peaches and cucumbers together, oh my.  While feeling the need for protein I did ask about the pork and beef.  While both were local, the beef was not grass fed, which made me wonder a little bit about the pork so I settled on my sides.

The waiter recommended the sides come out in courses, vs. all at once, which was perfect.  I could fully appreciate the flavors of one at a time.  Service 1 was the tomato and watermelon dish which was brought together with mint, basil and olive oil.  So light and refreshing.  Service 2 was new potatoes with thyme and basil in truffle oil, featuring blue, red and yukon gold new potatoes from the local farmer's market that melted in my mouth.  Service 3 was peaches and cucumber in a black peppery peach vinaigrette, again local produce from the farmer's market.  The Waiter raved about the peaches and they did not disappoint.  Of course I couldn't go without some protein...so I ordered Creme Brulee for dessert.  Perhaps a bit of a stretch on the protein part, but I swear there are eggs in there somewhere! 

I already have plans for my airport dinner tomorrow night - Tortas Frontera, a restaurant that lists the farms supplying their ingredients on a placard by their menu - thank you O'hare! 

While it took a little extra effort to find local fare, the food and the atmosphere have definitely been worth every minute of research.  And as I learned, it only takes finding one and asking for recommendations.  My only regret, I forgot my camera.  I wish I could share the beautiful food preparations with you.  Next time...

Thursday, August 25, 2011

Preparing for the Locavore Challenge

The last few weeks Dann and I have been passing around the Locavore Challenge registration form.  What to do, what to do.  I know I will be traveling for work some and while I've gotten used to transporting hard boiled eggs and gifts from my garden in my carry on luggage, I'm not sure I will be successful with the contents needed for 3 meals + snacks a day for the times away from home in unfamiliar cities.

I did reach out to a local organic farm in the area I am headed to next week for recommendations on where to eat but have yet to hear back.  If anyone reading this has recommendations for local/sustainable eateries in the Mettawa, IL area, please let me know.

So back to the Locavore Challenge.  I decided to look at the food side of the challenge by making a list of our favorite meals that I know will highlight local products of the season, I was happy to list 20 dinners without much thought at all!  and considering we usually have leftovers that also provides 20 lunches too.  I know I have another 10 dinners to go, but still I thought this was supposed to be a challenge? 

It is a wonder to think back to how we have changed our eating habits and have embraced the produce of the seasons when they are at the peak of their flavor.  When I see strawberries advertised in a salad in August I'm aghast, don't they know strawberries are a June fruit?  We should be using blueberries and peaches in our fresh salads in August!  Which I do, I LOVE grilled peaches on my salad, no dressing required, the juice of the peach provides the perfect dressing.  Don't get me wrong, we will be enjoying strawberries later this year - strawberries we froze after we picked our own in June.

Like food?  Try eating with the seasons in your area, the flavors will amaze you!

Wednesday, August 24, 2011

Sushi Salad - A Clean Eating Test Recipe

I have been enjoying the opportunity to test recipes for Clean Eating Magazine.  I'm excited each time I see a new e-mail full of recipes to try.  For the August/September issue (now on sale) one of our favorite testing recipes was Sushi Salad.  It made a large amount, allowing for lots of leftovers which is a huge win in my book. 

That is actually a very interesting statement - I never used to be big on leftovers.  So what has changed?  Using fresh ingredients and exploring with flavors, and in many cases looking for new lives for the leftovers including salads, stir-fries, and tacos to name a few. 

So what did we like about the Sushi Salad?  Well, first of all we love sushi - our favorite local restaurants include Wasabi and Seabar.  If you aren't sure about Sushi, I highly recommend Seabar as their menu is diverse and you can be introduced to sushi with non-fish sushi like their Beef on Weck sushi roll or stick with their 40 Hour Short Ribs for the non-adventurous. 

Secondly, I love wasabi (the condiment, not just the restaurant).  Adding the wasabi dressing to this dish made me feel like I had actually made sushi at home without the scary concept of actually making sushi at home.

I hope you enjoy this recipe too!  Enjoy many other delicious recipes in the latest issue of Clean Eating Magazine!


Sushi Salad (From Clean Eating Magazine August/September 2011 edition)

Serves 4. Hands-on time: 20 minutes. Total time: 50 minutes.

Serving size: 1 cup spinach, 1½ heaping cups rice mixture, ¼ avocado

INGREDIENTS:
1 Cup short grain brown rice
1 tbsp wasabi paste
2 tbsp low-sodium soy sauce
⅔ cup rice wine vinegar
½ tsp honey (Raw, from Bob Colligan in East Aurora)
1 English cucumber, diced into ¼-inch chunks (from Duink Farms in Hamburg)
4 nori sheets, quartered and cut into 1/4-inch strips
1 large carrot, peeled and thinly sliced
8 oz crab meat (claw or jumbo lump) (We used Salmon from Simply Alaskan Goods in Eden)
1 avocado, sliced
4 cups baby spinach (we used kale, from the garden)

INSTRUCTIONS:
ONE: In a medium saucepot, boil 2 cups water. Stir in rice, cover and reduce heat to low. Simmer for 30 minutes. Remove from heat and let sit, covered, for an additional 10 minutes. Spread rice on a baking sheet to cool.

TWO: In a small bowl, whisk wasabi paste, soy sauce, vinegar and honey. Set aside.

THREE: In a large mixing bowl, mix cooled rice, cucumber, nori and carrot. Drizzle with wasabi-honey mixture and stir to combine. With a rubber spatula, gently fold in crab.

FOUR: Divide spinach among serving bowls and top each with rice mixture and avocado.

TIP: If you can’t find prepared wasabi paste, make your own by whisking 1 tbsp all-natural wasabi powder with 1 tbsp water. 

Wednesday, August 17, 2011

Orzo with basil, tomatoes and lemon zest

This weeks recipe is one that has been in the line up for many years now thanks to our friend JJ who we met in our early years in Charlotte.  Feel free to jazz up this recipe with as many veggies as you'd like.  Dann of course added the bacon, that was not in the original recipe!

Orzo with Basil, Tomatoes and Lemon Zest

Cook 1/2 a box of orzo according to package directions (until al dente)
Meanwhile chiffonade 1 cup of basil and quarter 1lb of cherry tomatoes.
Dann would also have you cook bacon at this time....

Once orzo is cooked, drain, add basil & tomatoes, and the zest of one lemon to the orzo. Salt & Pepper to taste.

This dish is wonderful cold or hot. 

Monday, August 15, 2011

Hunting Tomato Hornworms

Tomato Hornworm


Each day Dann and I do a pass of the tomato plants in the garden, we aren't just looking for the shiny red fruit the plants share with us, we are looking for signs of Tomato Hornworms. 


While the worm itself isn't always easy to spot as it does it's best to "blend in" the signs are unmistakable.  Branches are missing leaves, and there are the droppings...yes, very large droppings are spotted usually on leaves just under where the horn worm is located.
Missing leaves - evidence of a Tomato Hornworm
Droppings - evidence of a Tomato Hornworm
Once the tell tail signs are spotted the hunt is on, another game of I Spy in the Garden.  Tonight we located 3 worms during our tour.  This is the second incident we've had, the first occuring about a month ago.  They seem to prefer our cherry tomatoes to the others at this time. 

I Spy a Tomato Hornworm
Of course the worms are not wasted in our yard, and in all honesty they are welcomed.  Dann removes them carefully from their perch and feeds them to the ladies as a delicacy he calls "Hornworm on a  Steek."

Tomato Hornworm on a Steek